How to Submit a CAPE Declaration in ACE Portal, From Setup to Claim Status
Follow the ACE Portal CAPE workflow step by step, with screenshots covering the template download, CSV save rules, validation result files, and claim status review.
If you already know your entries may qualify for CAPE Phase 1, the next problem is operational: what exactly do you click in ACE, what file do you upload, and where do you check what happened next?
This guide turns CBP’s April 2026 quick reference guide into a practical filing walkthrough. It covers the real submission path inside ACE Portal, including the CAPE tab, the File Uploads subtab, the Claim Status subtab, the Validation Result File, and the Claim Details download.
All screenshots below are based on the official CBP ACE Portal CAPE Declarations Quick Reference Guide.
If you still need help with account creation or refund banking, start with our ACE Portal account setup guide. If you are already hitting error codes, keep our CAPE upload troubleshooting guide open in another tab.
What You Need Before You Open CAPE
Before you try to upload anything, make sure these basics are already true:
- You are filing through the importer of record or the broker that filed the underlying entry summaries.
- The refund recipient has valid ACH refund information on file in ACE.
- Your entry list has already been screened for Phase 1 blockers such as open protests, drawback, reconciliation, and entries more than roughly 80 days past liquidation.
- You are using the account that actually has CAPE functionality. CBP’s quick reference guide notes that some non-importer filer accounts may see the tab but still show the feature as unavailable.
That last point matters more than it sounds. CAPE is not just an informational tab. It is tied to account type, filer ownership, and the entry data that ACE expects to see.
Step 1: Open the CAPE Tab and Download the Official Template
Inside ACE Portal, go to the CAPE tab and stay on the default File Uploads subtab. That is where the Upload button lives and where ACE keeps your upload history.
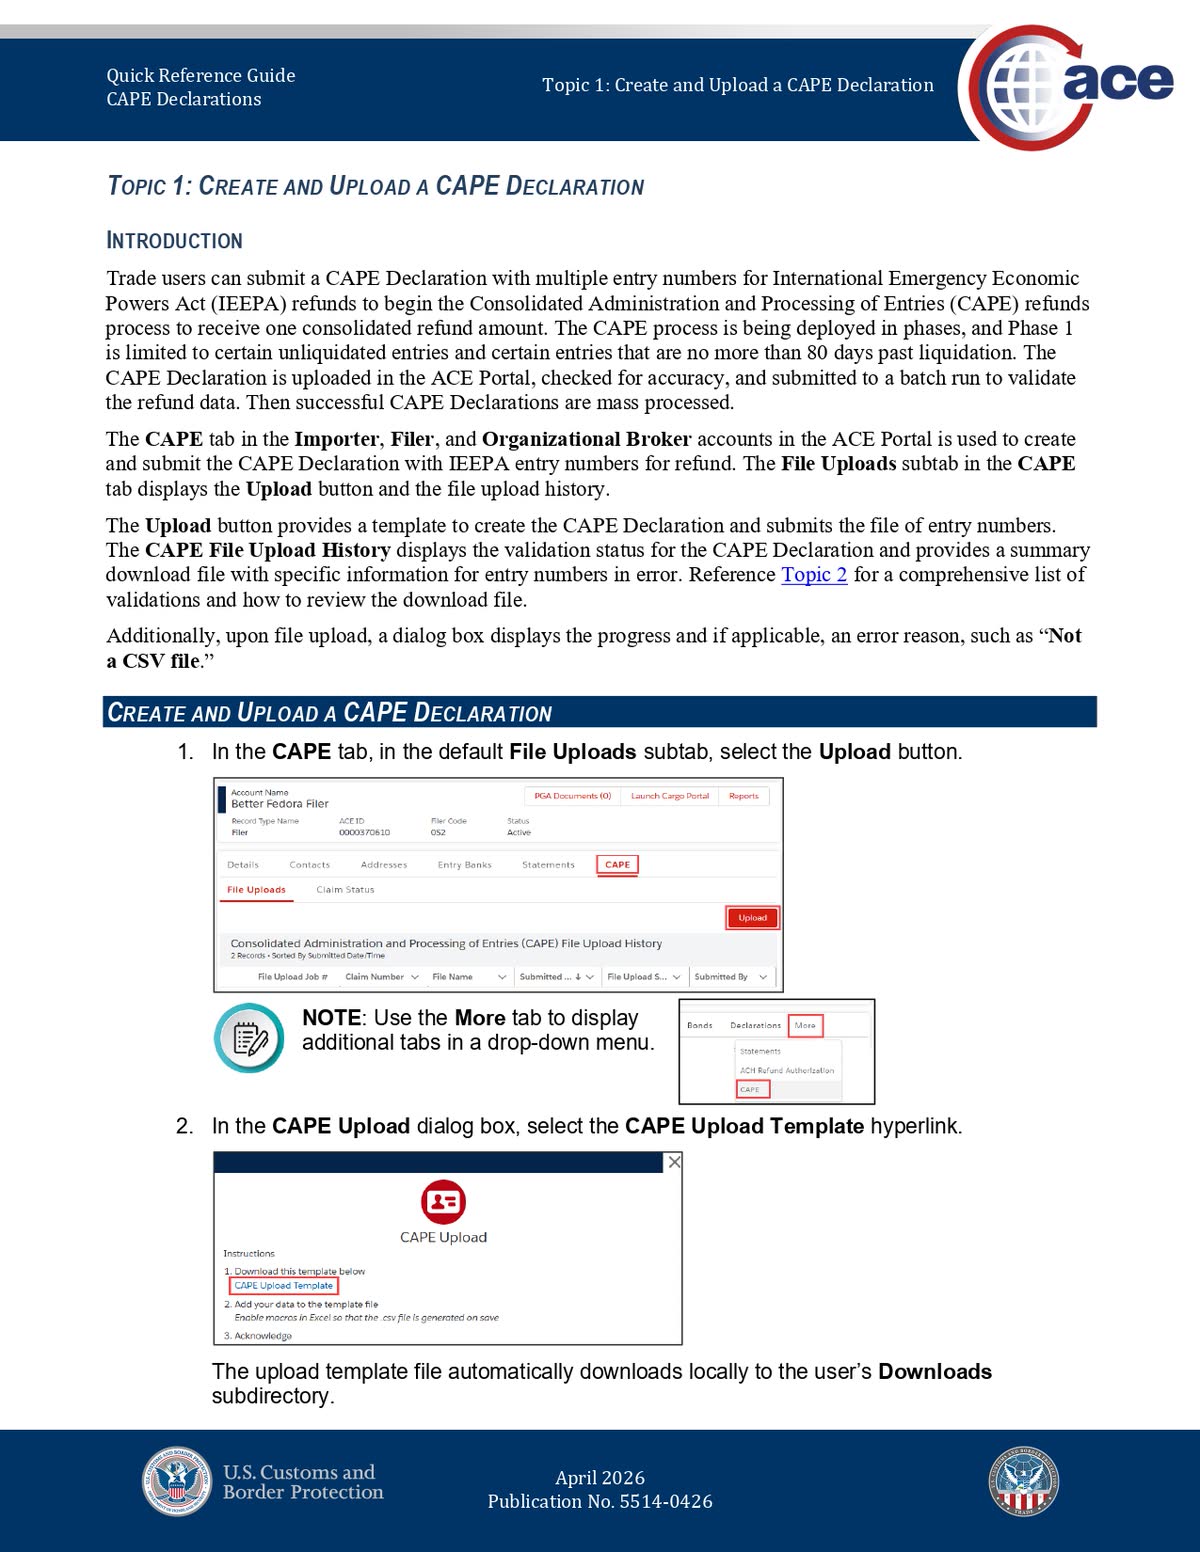
Click Upload. In the CAPE Upload dialog, select the CAPE Upload Template link. ACE downloads the template locally to the user’s Downloads folder.
Two practical takeaways here:
- If you do not immediately see the CAPE tab, check whether it sits under a More drop-down in ACE.
- Use the official template every time. Do not start from an old spreadsheet that may have hidden formatting or extra columns.
Step 2: Fill the Template the Way ACE Expects
The template is simpler than many importers expect. The first column uses the Entry Number header, and you begin entering qualifying entry numbers on the second row.
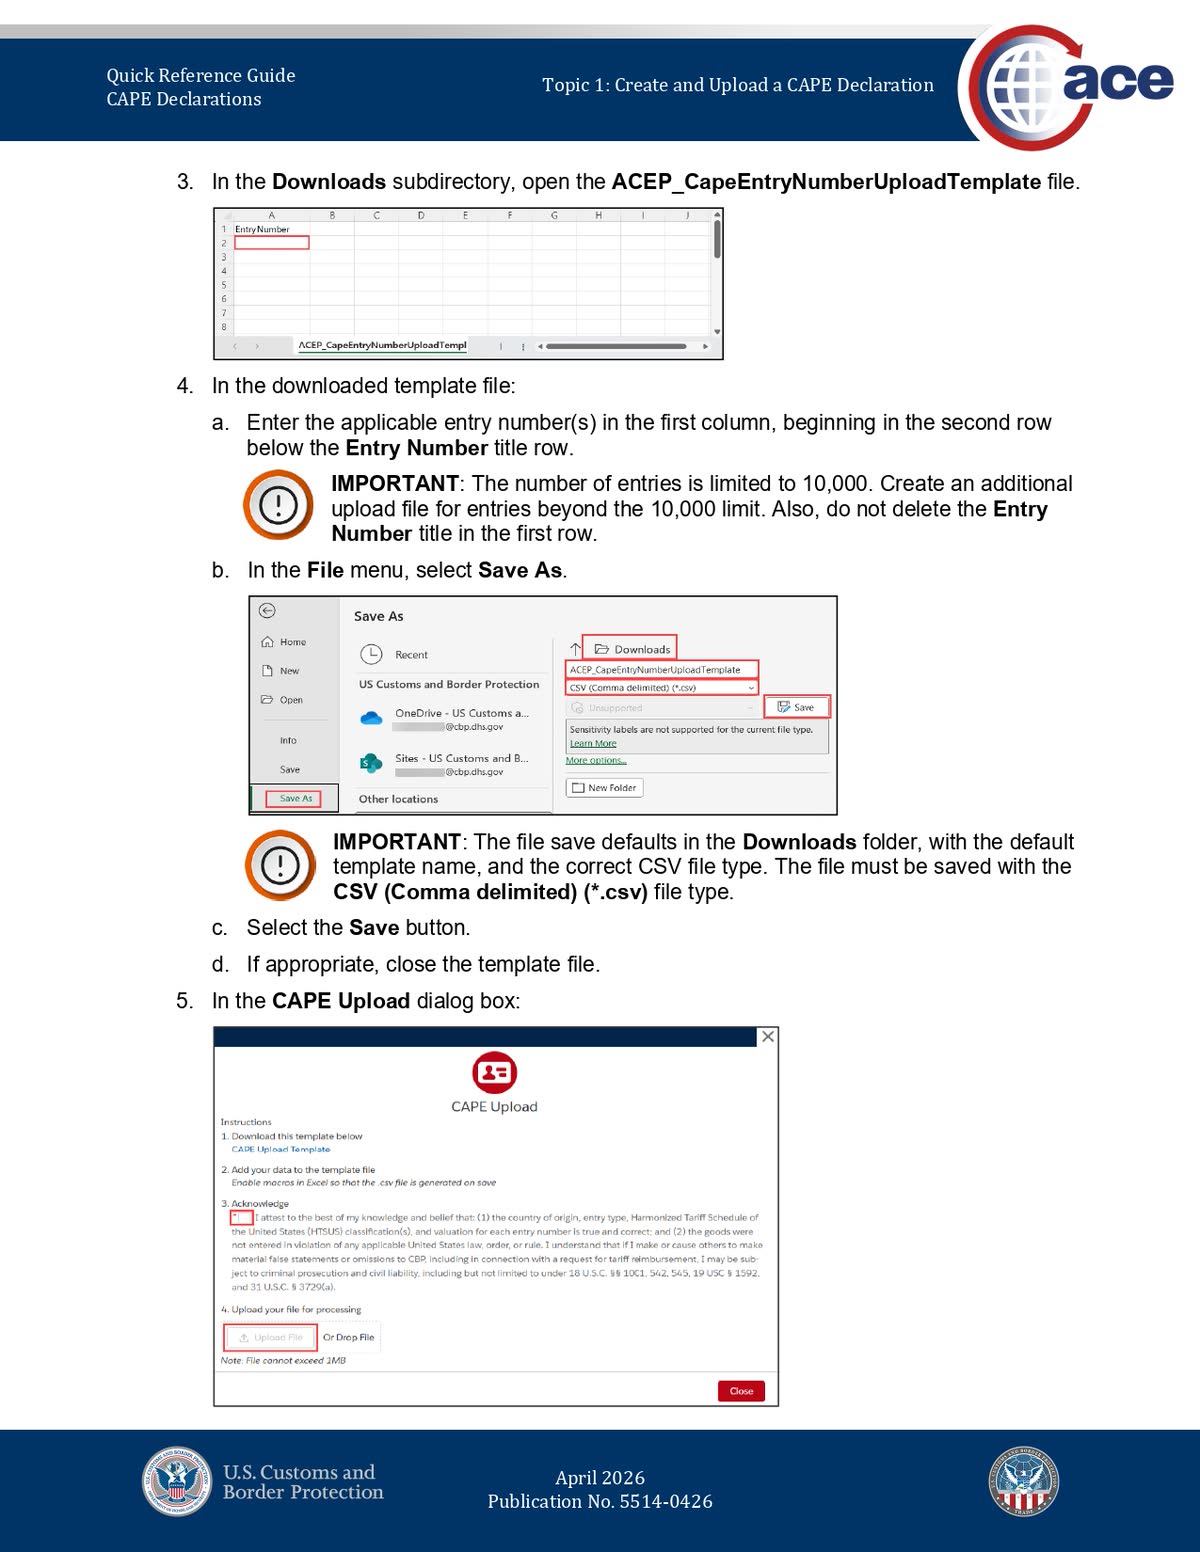
Use these rules before you save:
- Put one complete entry number in the first column for each row.
- Do not delete the Entry Number header row.
- Save the file as CSV (Comma delimited) (*.csv).
- Do not add ports, dates, notes, refund estimates, or other columns unless the template asks for them.
CBP’s quick reference guide uses a 10,000-entry limit in this screenshot set, while other official material has used 9,999. For filing discipline, stay at 9,999 or below so you are not building a process around the absolute edge case.
Step 3: Check the Acknowledgement Box Before You Upload
This is the small step that can stop the entire submission. In the upload dialog, the Upload File button is not active until you check the acknowledgement box.
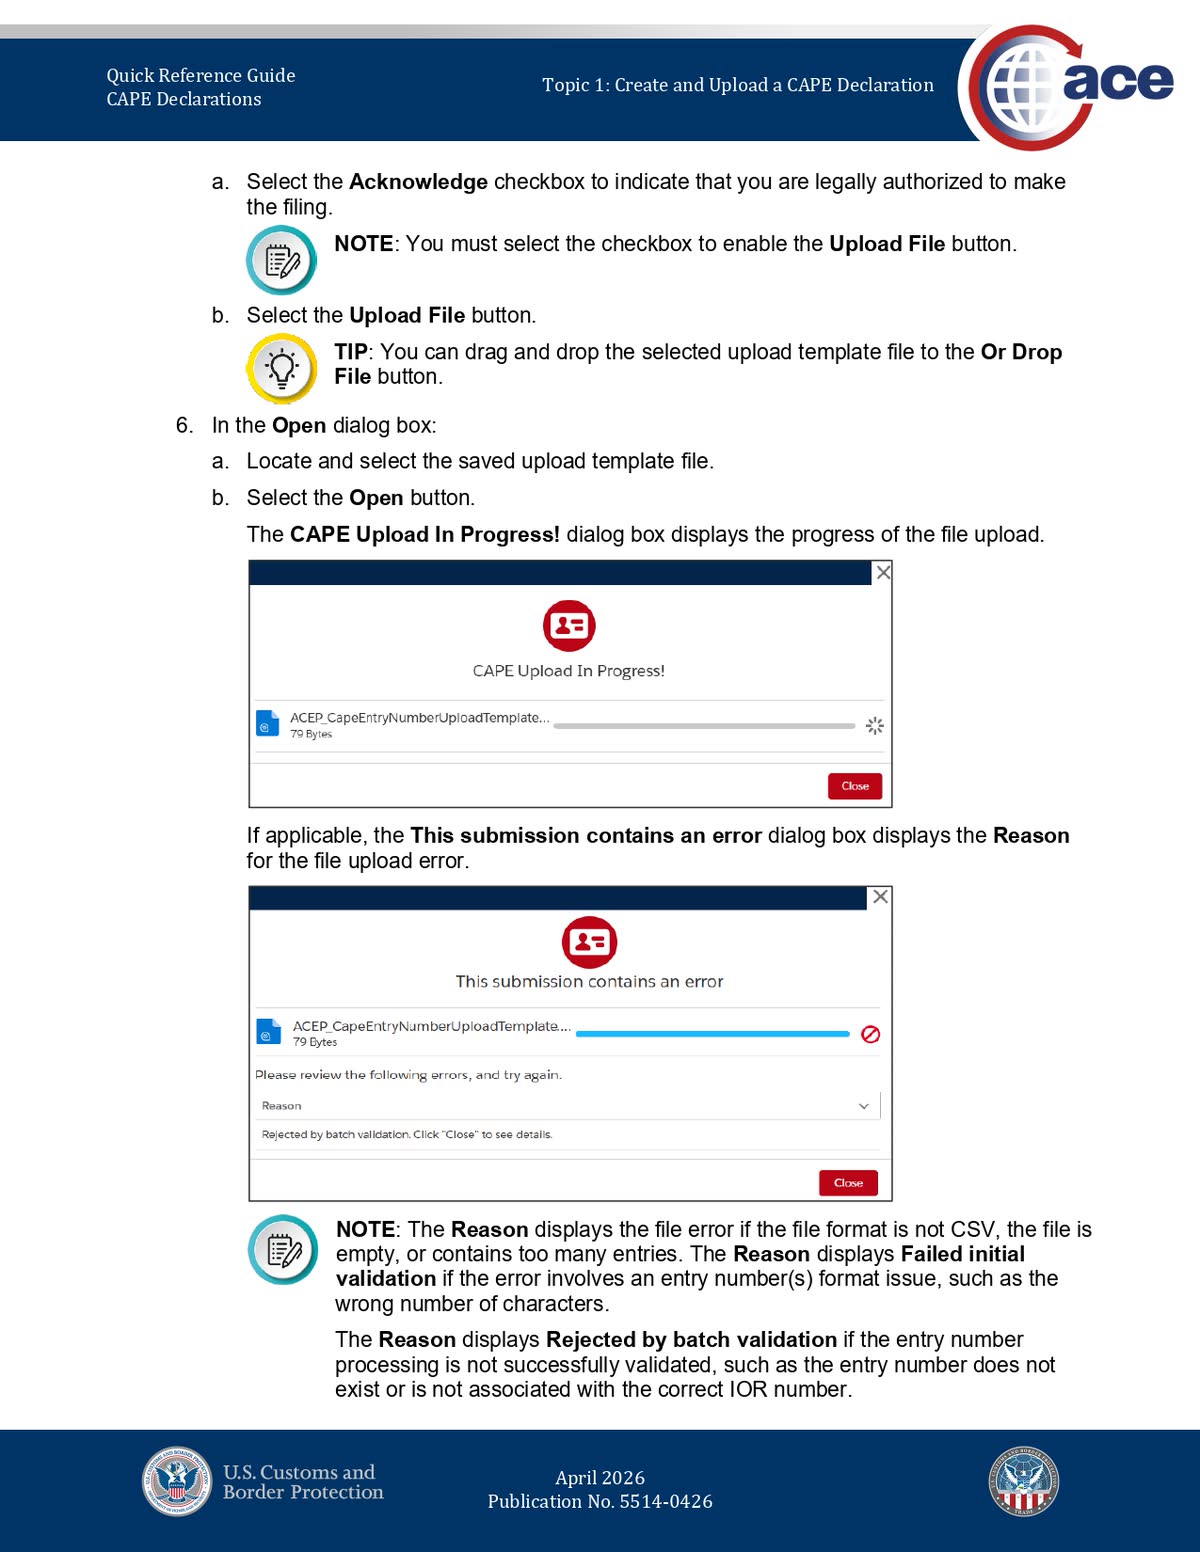
Before clicking Upload File, confirm three things:
- The file is a real CSV.
- The file is not empty and does not exceed the entry limit.
- The file stays under 1 MB.
If ACE rejects the upload at this stage, the Reason field may show a file-format problem, Failed initial validation, or Rejected by batch validation.
Step 4: Read ACE’s Validation Language Correctly
CBP separates CAPE problems into file-level checks, entry-format checks, and deeper claim-validation checks. That is why two different declarations can both “fail,” but for completely different reasons.
Here is the shortest useful way to read those statuses:
- Specific file format error: ACE rejected the file package itself, such as a missing header row, a non-CSV file, or an empty file.
- Failed initial validation: ACE found an entry-format problem, such as the wrong number of characters, duplicate entry numbers, or a filer-code mismatch.
- Rejected by batch validation: ACE could read the file, but deeper validation failed, such as an entry not existing or not matching the correct importer account.
- Accepted with Error(s): some entries moved forward and others did not.
That distinction controls what you do next. If the problem is a file upload error, correct the file and upload the full file again. If the problem is a claim error, correct only the affected entries and upload those corrected entries on a new CAPE declaration.
Step 5: Use File Uploads to Download the Validation Result File
Do not stop at the status label alone. Open the job details in File Uploads and download the Validation Result File when ACE gives you that option.
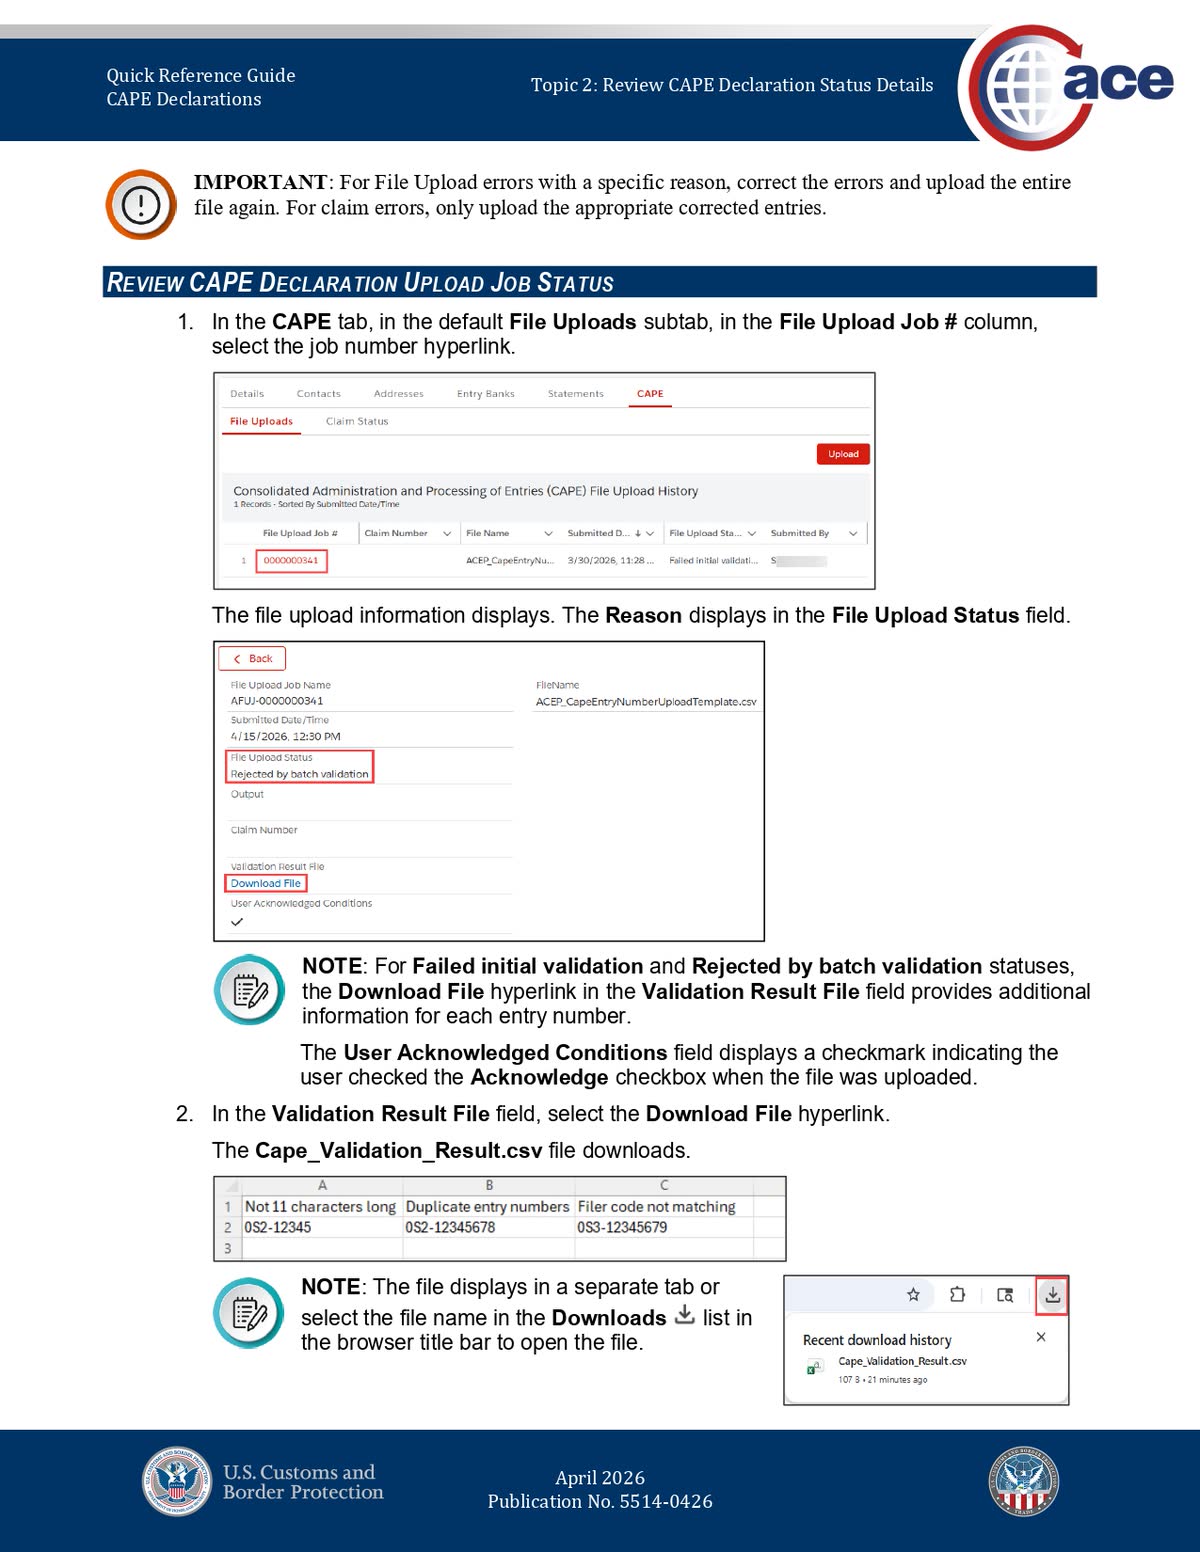
This file is where ACE becomes actionable. CBP’s example shows errors such as:
- not 11 characters long
- duplicate entry numbers
- filer code not matching
That lets you separate a bad file from a bad entry list instead of guessing from a single on-screen label.
If you need a deeper breakdown of these statuses and what to refile, see our CAPE upload troubleshooting guide.
Step 6: Switch to Claim Status and Download Claim Details
Once ACE processes the declaration far enough to create a claim, switch from File Uploads to Claim Status. This is where you see whether the declaration was Rejected, Accepted with Error(s), or Accepted.
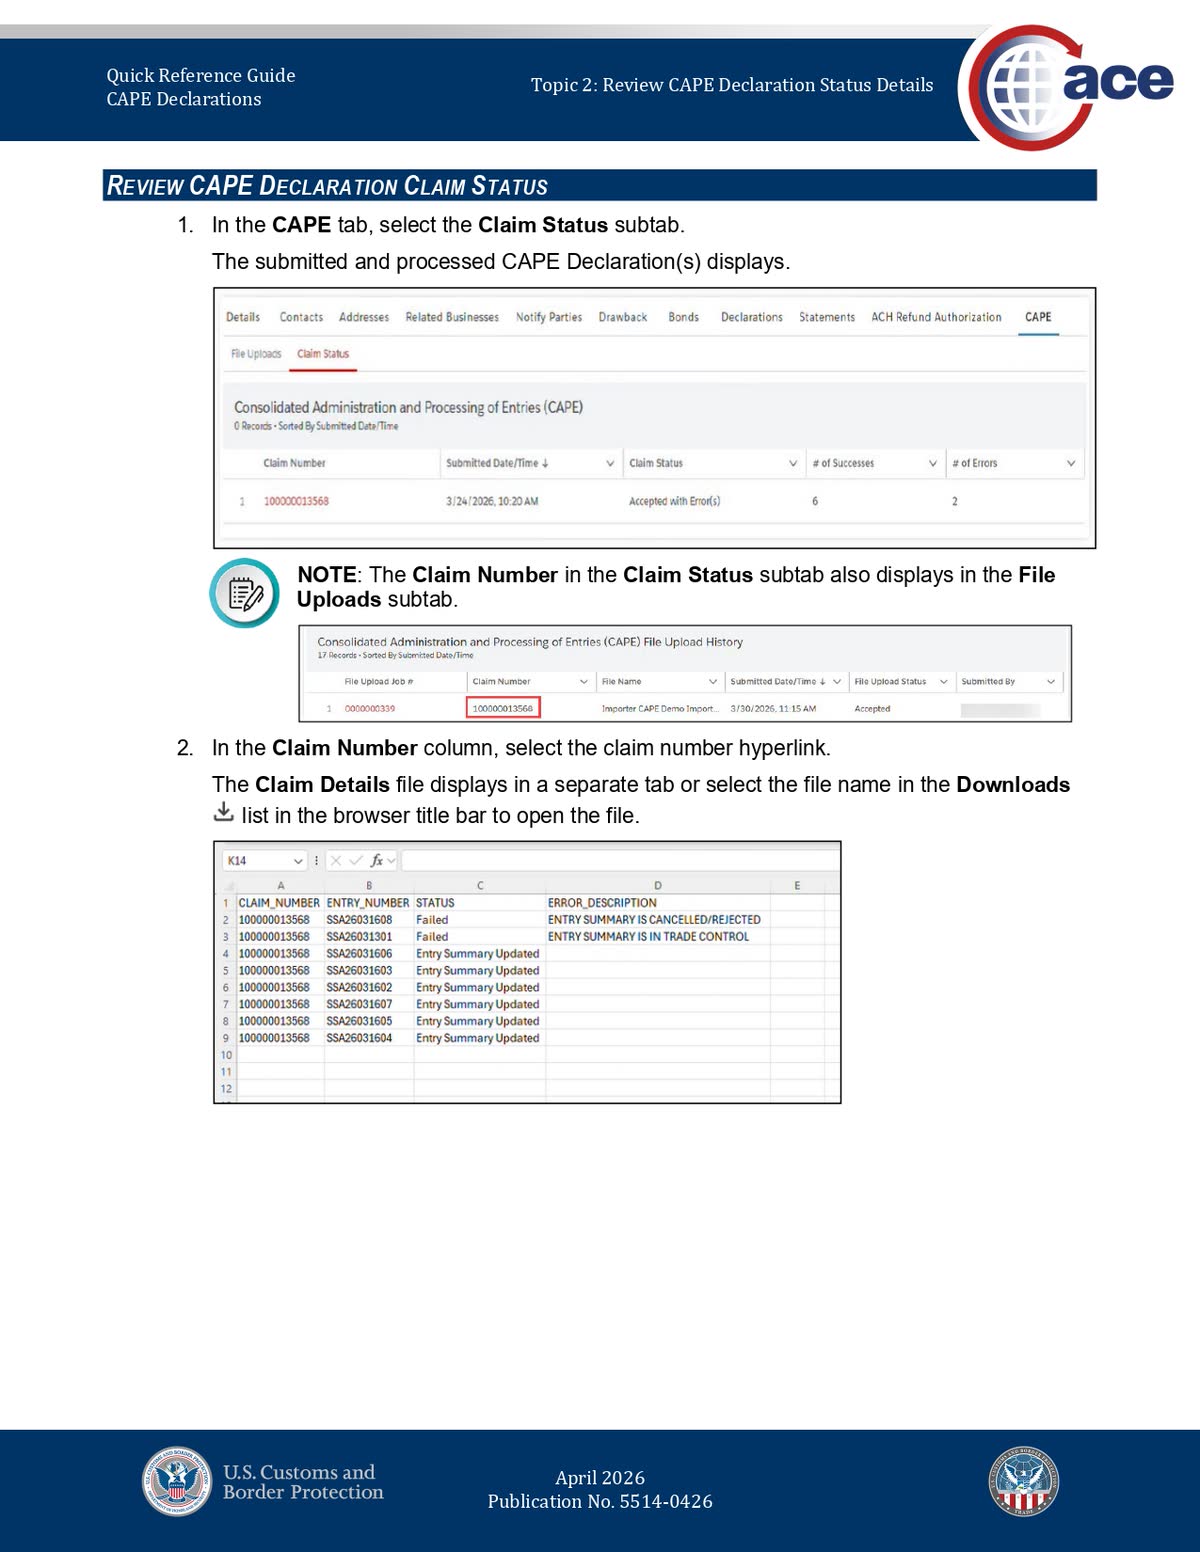
The Claim Details file is the document you use to answer the real operational question: which entries were accepted, and which ones still need attention?
CBP’s example shows the split clearly. Some entries are updated successfully, while others show error descriptions such as:
- Entry Summary Is Cancelled/Rejected
- Entry Summary Is In Trade Control
That is why “Accepted with Error(s)” should never be treated as a clean all-clear.
The Practical Filing Sequence to Follow Every Time
If you want a repeatable ACE workflow, use this order:
- Confirm the right filer account and refund recipient.
- Open CAPE on File Uploads and download the official template.
- Enter qualifying entry numbers only and save the file as CSV.
- Check the acknowledgement box and keep the file under 1 MB.
- Read File Uploads first for upload-job status and validation downloads.
- Move to Claim Status only after ACE creates the claim number.
- Download Claim Details before deciding what to refile.
This matters because CAPE is not a one-click refund tool. It is a validation workflow inside ACE, and the result can be mixed even when the upload itself succeeds.
Three Mistakes That Cause Avoidable Rework
Treating ACH setup and CAPE upload as the same thing
They are related, but not identical. CAPE submission happens in the CAPE tab. Refund disbursement depends on a separate ACH refund setup in ACE.
Assuming the Upload File button means your account is ready
It only means you can start the workflow. You still need the correct filer relationship, correct importer context, qualifying entries, and a valid file.
Looking only at one ACE screen
File Uploads tells you about the job and its validation output. Claim Status tells you what the processed declaration actually did. You need both views to manage a CAPE filing correctly.
What To Do After You Finish the Upload
If the declaration is fully accepted, monitor refund timing and liquidation outcomes through ACE. The three reports that matter for CAPE specifically:
- ES-022 — CAPE claim status by entry
- ES-701 — courtesy notice of liquidation with refund and interest
- REV-615 — Trade CAPE Detail Refund Report (available since April 20, 2026; CAPE-specific consolidated view with entry-level detail)
Full walkthrough: Track your CAPE refund status with REV-615, ES-022 and ES-701 →
If the declaration is only partially accepted, rebuild a narrower file using only the corrected rejected entries.
If your entries involve multiple brokers, protests, final liquidations, or other complications outside the standard Phase 1 lane, do not rely only on the ACE screen flow. That is where a case-specific strategy review matters.
Need a case-specific review before you refile?
If your entries were filed by multiple brokers, involve protests, or sit outside the standard Phase 1 lane, start with the assessment before you keep uploading corrected files.
We are not a law firm, customs broker, or government agency. We provide educational content and connect importers with vetted trade law professionals.